Windows Tutorials - Herong's Tutorial Examples - v5.62, by Dr. Herong Yang
Reducing the Size of a Picture File
This section provides a tutorial example on how to reduce the picture size and file size using 'Paint' program.
Suppose you have a picture downloaded from a digital camera called pic_001.jpg. The file size is about 2,100 KB. This is good for printing a hard copy. But it is too big to put it on your personal Web page. You could use Paint to reduce the picture size and file size.
1. Run Paint.
2. Select Paint menu, then "Open". The open dialog box shows up.
3. Locate the picture file, img8.jpg and click the Open button. Your picture will be loaded into Paint.
4. Look the status line near the bottom line. You see an icon and "1920 x 1200px". This tells you that the picture is 2592 pixels wide and 1944 pixels high.
5. Select menu "Home > Resize". You see the "Resize and Skew" dialog box showing up.
6. Enter 25% in Horizontal Stretch and Vertical Stretch fields and click the OK button. The picture will be reduced to 25% of its original size as shown in the picture below:
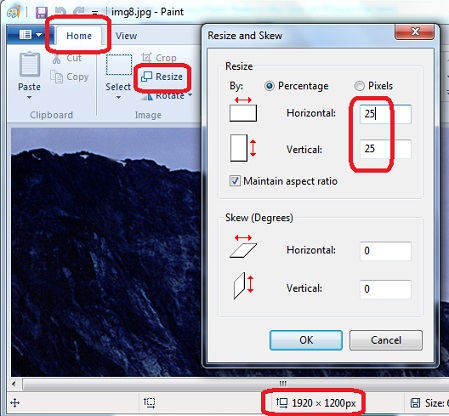
7. Click the OK button on the dialog box to reduce the picture size to 25% in both directions. The resulting size will be about 480x300 pixels.
8. Select the Paint menu, then "Save", to save the picture with the reduced size.
9. Look at the picture file, img8.jpg, again. The file size is reduced to 67KB.
Table of Contents
Introduction to Microsoft Windows
Introduction to Windows Explorer
Introduction to Internet Explorer
►"Paint" Program and Computer Graphics
Introduction to "Paint" - The Simplest Graphics Tool
Dots, Pixels, Colors and Resolution
►Reducing the Size of a Picture File
Converting File Format from GIF to JPG/JPEG
GIMP - GNU Image Manipulation Program
JPEG Image File Format Quality and Size
GIF Image File Format and Transparent Background
"WinZip" - ZIP File Compression Tool
"WinRAR" - RAR and ZIP File Compression Tool
FTP Server, Client and Commands
"FileZilla" - Free FTP Client and Server
Web Server Log Files and Analysis Tool - "Analog"
Spyware Adware Detection and Removal
IE Addon Program Listing and Removal
Vundo (VirtuMonde/VirtuMundo) - vtsts.dll Removal
Trojan and Malware "Puper" Description and Removal
VSToolbar (VSAdd-in.dll) - Description and Removal
Spybot - Spyware Blocker, Detection and Removal
Setting Up and Using Crossover Cable Network
Home Network Gateway - DSL Modem/Wireless Router
Windows Task Manager - The System Performance Tool
"tasklist" Command Line Tool to List Process Information
"msconfig" - System Configuration Tool
Configuring and Managing System Services
Windows Registry Key and Value Management Tools